EggGen3: Difference between revisions
From SubeNews
Jump to navigationJump to search
No edit summary |
|||
| (21 intermediate revisions by 3 users not shown) | |||
| Line 5: | Line 5: | ||
== Gen3 Howto Guides == | == Gen3 Howto Guides == | ||
* Assembling the gen 3 gearbox after upgrading all the bearings (Andre K) [[Media:AK-Gearbox-Assembly.pdf]] | |||
* Front Seal Upgrade Procedure [[Media:FrontSealUpgradeProcedure.pdf]] | * Front Seal Upgrade Procedure [[Media:FrontSealUpgradeProcedure.pdf]] | ||
* Gen 3 Gearbox Upgrade Procedure (from previous Generation Gearboxes) [[Media:G3_Upgrade.pdf]] | * Gen 3 Gearbox Upgrade Procedure (from previous Generation Gearboxes) [[Media:G3_Upgrade.pdf]] | ||
* Quinti Brush Block for G3 Gearbox (Service Bulletin) [[Media:SB_EarlyQuintiBlock.pdf]] | * Quinti Brush Block for G3 Gearbox (Service Bulletin) [[Media:SB_EarlyQuintiBlock.pdf]] | ||
* [[ | * Removing the Dual Mass Friction Plate from the Flywheel [[Media:Removing-Dual-Mass-Fricton-Plate.pdf]] | ||
* Tapping the Dual Mass Flywheel [[Media:Tapping-Dual-Mass-Flywheel.pdf]] | |||
* Gen 3 Gearbox Alignment Instructions [[Media:PropellerGearboxAlignmentProcedure.pdf]] | * Gen 3 Gearbox Alignment Instructions [[Media:PropellerGearboxAlignmentProcedure.pdf]] | ||
(Note: Add the following sentence at the end of step 12 in the Gearbox Alignment Instructions: | (Note: Add the following sentence at the end of step 12 in the Gearbox Alignment Instructions: | ||
| Line 15: | Line 16: | ||
This step will insure that everything stays put while you take your time applying Loctite and installing | This step will insure that everything stays put while you take your time applying Loctite and installing | ||
bolts for the last time.) | bolts for the last time.) | ||
== Tools == | |||
* [[EggGen3:AlignmentTool|Diagrams for making your own Gearbox Alignment Tool]] | |||
If you make this tool, please use plus/minus .001" as a tolerance between all of the center distances. | |||
== Resources == | |||
* [[EggGen3:Disassembly|Overview of Gearbox Disassembly and Misc Gearbox Pictures]] | * [[EggGen3:Disassembly|Overview of Gearbox Disassembly and Misc Gearbox Pictures]] | ||
* [https://wiki.subenews.com/files/Gen3-Gearbox/Gen3-Gearbox-Video.wmv Gen3 Gearbox Video] | * [https://wiki.subenews.com/files/Gen3-Gearbox/Gen3-Gearbox-Video.wmv Gen3 Gearbox Video] | ||
* [[EggGen3:2009H6|Pictures of the 2009 H6 gearbox mounting (should be the same for 2007 and later)]] | |||
* [[EggGen3:Seal|PSRU Gen 3 v 4 Front Seal Information (ordering details)]] | |||
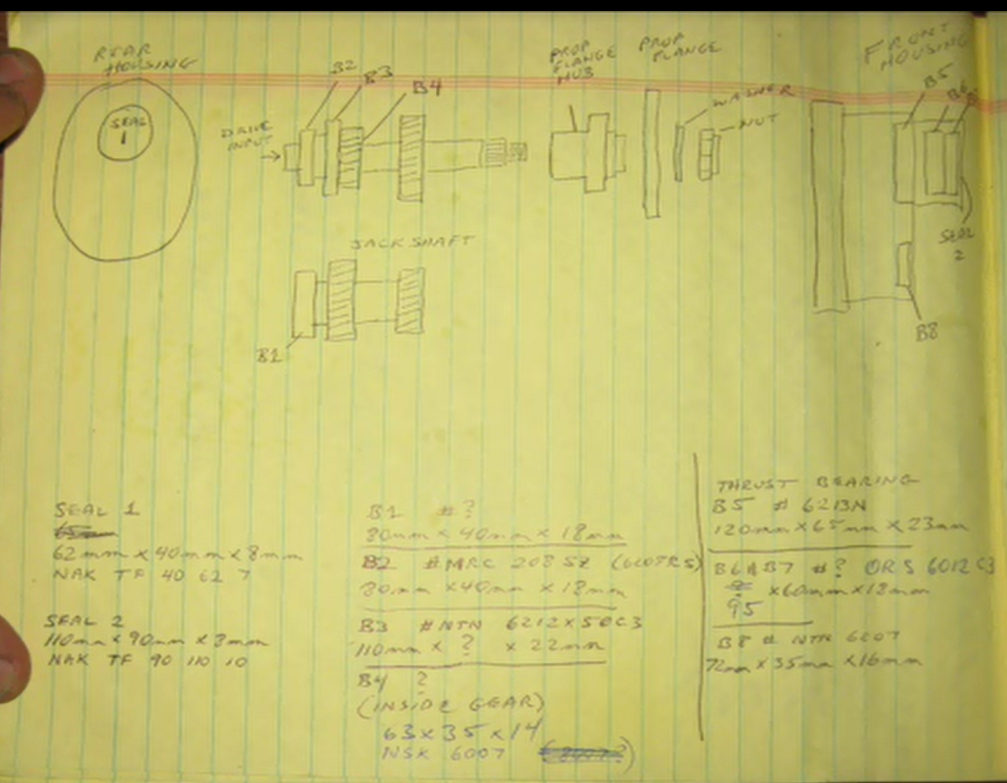
* Diagram of Bearings and Seals for Egg PSRU 3v4: | |||
** PDF: [[Media:EggPSRU3v4-diagram.pdf]] | |||
** Original Sketch Image: [[Media:EggPSRU3v4-original-sketch.png]] | |||
** [https://wiki.subenews.com/files/Gen3-Gearbox/EggPSRU3v4-diagram.vsd Visio VSD file] | |||
* PSRU Mods by Tom [[Media:2014PSRUMods.pdf]] | |||
* PSRU Mods Followup by Tom [[Media:2014PSRUModsFollowup.pdf]] | |||
== FAQs (Frequently Asked Questions) == | == FAQs (Frequently Asked Questions) == | ||
Latest revision as of 01:03, 16 February 2016
Eggenfellner Gen3 Gearbox
Manufacturer's Listed Specs
Gen3 Howto Guides
- Assembling the gen 3 gearbox after upgrading all the bearings (Andre K) Media:AK-Gearbox-Assembly.pdf
- Front Seal Upgrade Procedure Media:FrontSealUpgradeProcedure.pdf
- Gen 3 Gearbox Upgrade Procedure (from previous Generation Gearboxes) Media:G3_Upgrade.pdf
- Quinti Brush Block for G3 Gearbox (Service Bulletin) Media:SB_EarlyQuintiBlock.pdf
- Removing the Dual Mass Friction Plate from the Flywheel Media:Removing-Dual-Mass-Fricton-Plate.pdf
- Tapping the Dual Mass Flywheel Media:Tapping-Dual-Mass-Flywheel.pdf
- Gen 3 Gearbox Alignment Instructions Media:PropellerGearboxAlignmentProcedure.pdf
   (Note: Add the following sentence at the end of step 12 in the Gearbox Alignment Instructions:
   "Tighten all bell housing bolts to approx. 250 lb.-in. then recheck alignment."
   This step will insure that everything stays put while you take your time applying Loctite and installing
   bolts for the last time.)
Tools
If you make this tool, please use plus/minus .001" as a tolerance between all of the center distances.
Resources
- Overview of Gearbox Disassembly and Misc Gearbox Pictures
- Gen3 Gearbox Video
- Pictures of the 2009 H6 gearbox mounting (should be the same for 2007 and later)
- PSRU Gen 3 v 4 Front Seal Information (ordering details)
- Diagram of Bearings and Seals for Egg PSRU 3v4:
- PDF: Media:EggPSRU3v4-diagram.pdf
- Original Sketch Image: Media:EggPSRU3v4-original-sketch.png
- Visio VSD file
- PSRU Mods by Tom Media:2014PSRUMods.pdf
- PSRU Mods Followup by Tom Media:2014PSRUModsFollowup.pdf